Home About Press Crafts Recipes

Thursday, May 31, 2012

Recipe Round-up

Even though I haven't posted any recipes in awhile, I've actually been cooking/baking quite a bit. Lately its been all about trying out new recipes.  So today I thought I would share a few that have been popular around here.

Tuscan Lemon Muffins - What makes these muffins unique is that they're made with olive oil and ricotta cheese.  They're moist and not overly sweet.  Next time I make them, I want to try adding a little rosemary.  (Tuscan Muffin pictured above)

Green Smoothie Cups - The beauty of these smoothie cups is that you make them in portion size and store them in the freezer.  When you're ready to make your smoothie, all you need to do is blend two of the frozen cups plus coconut water.  These are perfect for summer.  I recommend making a couple batches at a time if you like them.  There's a lot of prep so it's easier to do it all at once.

Rhubarb Yogurt Cake - This cake is easy to make and isn't overly sweet.  This would be perfect to make for a brunch.  My children didn't care for the rhubarb (thought it was too tart).  So if you plan on serving it to children, you might want to replace the rhubarb with blueberries or strawberries.

Slow Cooker Pulled Pork - Recipes don't get much easier than this (only four ingredients).   We like to make sliders with the pulled pork and eat it with Kings Hawaiian bread.  

Try any new recipes lately?  Have any good ones to share?

Sunday, May 27, 2012

How to Fold Origami Diamonds

This craft came about from a Twitter conversation I had with Marisa (Omiyage).  She mentioned she was on the hunt for some neon origami paper.  That instantly sparked my interest and had me pondering all the cool things one could make with neon origami paper.  Marisa offered to send me a sample of the origami paper so I took her up on the offer.  The original plan was to make a shoe but somehow that got derailed and I ended up creating origami diamonds instead.  You know how that goes, one craft project leads into another project which transforms into yet another project.

Supplies:
Origami six inch square paper - If you're interested in neon origami paper, you can find it at Marisa's online shop Omiyage.

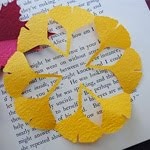
For this origami fold, we're basically making the traditional water bomb with a few alterations.  If you already know how to fold a water bomb, you may want to skip down to the last steps.

1.  Start with paper wrong side up.  I took the photo of the paper right side up by accident.  Just pretend that top square is white.

2. Fold paper in half.  Your paper should now look like the bottom picture.  Fold the paper on dotted lines and unfold.

3.  Bring the bottom left corner of the rectangle over to the right bottom corner.

4.  Flatten it down so it looks like the bottom picture.  Turn paper over and repeat on opposite side.

5.  Your image should now look like the top photo.  Fold bottom left and right flaps up and fold on dotted lines.

6.  Your paper should now look like the bottom photo.  Turn paper over and repeat on opposite side.

7.  Your paper should now look like the top photo.  Fold left and right flaps to meet in the center on dotted lines.

8.  Your paper should now look like the bottom photo.  Turn over and repeat step 7 on opposite side.


 9.  Pull down top left and right flaps and tuck them into opening where arrows are pointing to.

10.  Your paper should now look like the image below.  Turn paper over and repeat step 9 on opposite side.

At the bottom of your paper is a little hole that you will blow into just like a balloon. Your paper should puff up into the diamond shape.  If you have trouble with it blowing up all the way, you can use a toothpick to push out all the corners.

Now I feel like singing Diamonds Are a Girl's Best Friend.

Thursday, May 24, 2012

Printable: Paper Cone Dolls

Photo Credit:  Mr. Printables     Via: Sweet Tidings

Where were these cute paper dolls when baseball season started?   These really could have come in handy to distract my youngest when we sat through my son's two hour game.  I suppose there's always next year. 

Want to make a doll set to entertain your child (or inner child)?  Stop by Mr. Printables for the free download.  While you're there, check out The Adventures of Peg Dolls.  It will have you asking, "Why didn't I think of that?!".


I have a fun origami project planned for next week.  Stop by Monday to see what I've been up to.

Wednesday, May 23, 2012

Washi Tape inspired T-Shirts

Dear mt masking tape, how I adore you.  Let me count the ways,

your pretty prints

your craft tape

your T-SHIRTS!

Uniqlo and mt masking tape have teamed up to create these washi tape inspired t-shirts.  Uniqlo has a US site but there's no sign of the collection in the shop yet.  I'm keeping my fingers crossed that the collection will make its way to the states soon.

Monday, May 21, 2012

Letting Go to Go To Camp

I've got a confession to make, I'm somewhat of a helicopter mom.  My husband says I'm in the 90th percentile but can these things really be measured?  Lets just say I fall somewhere down the middle.  The reason I'm telling you this is because summer camp is rapidly approaching and I will be sending my children off to camp for the first time ever! I've never really been away from them that long unless they've been with relatives.  I help out at their school, stay to watch baseball practices, I even volunteer at VBS to keep an eye on them.  So the idea of sending them to camp with strangers kind of freaks me out a little.  I even almost passed up the opportunity over my protective tendencies.   Here's the story. . .

A while back Galileo Learning contacted me, asking if I would like to review their camp in exchange for a free week of camp for my children.  I checked out the site and really liked what the camp had to offer but was not so sure if I was willing to send my children there free or not.  I tried to stay open minded and decided to meet with the staff at a luncheon. 


When I first arrived at the headquarters I was really surprised by the space.  It was blooming with creativity from two headed lamas made out of newspaper to hanging decorations from the ceiling (picture Anthropologie meets camp headquarters).  It was obvious this was a fun and creative place but I needed more.

Next, I met the staff who were all very friendly.  As they talked about Galileo Learning it was obvious how passionate they were about the camp.  And what really came through was their genuine desire to teach children to be innovators.  This wasn't just another babysitting opperation.

But what really sold me, was their staff hiring process.  All applicants go through a four round hiring process which means only about 10% of the applicants are hired.  Also, all lead instructors are college graduates.  And many of the staff are educators in the school year. This was the reassurance I needed.

And to top it off,  I discovered I could find out online who the staff would be for my child's camp. That's right, they give full names plus credentials.  So now I think I'm ready to let go and let them go to camp.

To learn more about Galileo Learning, please visit the official site. You might also want to check out my post about Galileo's innovation approach.


Sunday, May 20, 2012

My First Rodeo

Every year a rodeo is  held close to our home town but I never seem to make it out to the event.  My husband and children have attended but some how I always miss out on the action.  So this year I decided it was time we went as a family.  Below are a few pictures of our experience.

Saddle Bronco Riding Competition

Linguica Burger

Most of the food at the concession stands consisted of BBQ and beer.  We also got a big bag of kettle corn. Man is that stuff addicting.

My daughter checking out the animals.  


Lots of cowboy hats.

I'll be honest, I was kind of hoping there would be some homemade booths to check out at the rodeo.  You know, maybe find a cute pair of boots or a belt but no luck.

Leather Chaps

Some of the women in the rodeo were wearing real fancy chaps with pink fringe and other decorative embellishments.  

My son laughing at the rodeo clowns, probably one of his favorite parts about the rodeo.

So that's what we did over the weekend.  How about you?
 

Wednesday, May 16, 2012

Craft Book Review: Reinvention

When Wiley publishing asked if I would like to review a copy of Reinvention by Maya Donenfeld of course I said yes.  I've been following Maya's blog (Maya Made) for years now and when she announced she was publishing a book, I couldn't wait to see it.  I knew it would be just as inspiring and creative as her blog.

Reinvention by Maya Donenfeld is a sewing book filled with 28 projects made from salvaged materials.  The chapters are broken down by materials, Linen, Burlap, Jersey, Wool, Denim, Mailers, and Vintage. Along with the projects, there are also two chapters dedicated to sewing basics and printing basics.  This book has projects for everyone from sewer beginners to advanced.

One of the things that stood out to be in this book was that Maya shares the history of the materials and their environmental impact.   For example, she shares about the product Tyvek which I knew nothing about until reading Maya's book.  The Environmental Impact section really made me think about some of the products I buy and what I could do without.

Below are few of my favorite projects.

Toadstool Cottage made with felted wool.

Reversible Summer Sling with Maya's signature gingko leaf prints.

Little Forager Skirt made with jersey.  I'm thinking this would be perfect for a day at the beach searching for sea glass.

Do you like to work with recycled materials? If so, what's your favorite material to work with?  Please share.

Sunday, May 13, 2012

Kid Craft: Mini Surfboards

Here's a fun kid craft for the summer months ahead, mini surfboards. These surfboards can float on water making them perfect for the bath or pool.  Plus, they are made out of items you probably already have at home.  Here's the how-to.

Supplies:
Styrofoam meat or vegetable tray packaging - make sure to wash well if it was used for meat
Scrapbook Rub-on Transfers
Scissors
Pencil

Draw surfboard shapes on back of styrofoam.  Drawing on the back will disguise any mistakes. 

Cut surfboards out with standard scissors.  I was able to get three surfboards from one tray.

Position transfers on your surfboard and rub on.  If you don't have rub-ons transfers, try using crayons.  I don't recommend using marker since it can bleed into the water.

We made our surfboards 5 inches long by one and a half inches wide.  You can make them any size you want, there's no wrong or right way.


We tested out the surfboards in the water and they were able to hold two Lego minifigures on one board.  The rub-ons stay on well too.  I wasn't sure if they would be waterproof but so far so good.


Friday, May 11, 2012

Printable Mother's Day Cards

Just in case you missed this printable last year, I'm sharing it today. Inessa from Diaper Style Memoirs and Maddie from Colour Me There created this cute card for Mother's Day (May 13th). There's also a mother and daughter version of the card. Stop by Diaper Style Memoirs for the free printable.

Here are a couple other cute printables from around the web:

Floral Mother's Day Card by Joy Charde of Creative Mamma

Watercolor Mother's Day Card by Jessica Jones of How About Orange

*If you haven't entered yet, check out the Hello Kitty T-Shirt Giveaway going on. Last day to enter is May 13th. 

Wednesday, May 9, 2012

Hello Kitty T-Shirt Giveaway

Welovefine recently asked if I would like to host a giveaway and I thought that was a great idea.  One, I haven't posted a giveaway in awhile. And two, I like Hello Kitty and I'm pretty sure many of you like Hello Kitty as well. Win win. 

Above are a few of my favorite Hello Kitty T-Shirts (all adult sizes) from the welovefine site.  I especially like the Mexican inspired folk art Hello Kitty tees.  You'll find a large selection of Hello Kitty t-shirts along with other brand names such as Marvel, Muppets, and Jem on welovefine.

How to Enter. . .

Click here to visit welovefine and tell me which $25 Hello Kitty Shirt you would choose if you won.   One entry per household. Please leave an email address so I can contact you if you win. The last day to enter the contest is Sunday, May 13 2012. I'll announce the winner Monday, May 14th on this post. If I do not hear back from the winner after two weeks, I will choose a new winner. Open to US residents only.  Good luck.

Contest Closed

Congratulations to Jennifer E who is the winner of the Hello Kitty T-shirt Giveaway!

Thank you to everyone who entered the giveaway.

Tuesday, May 8, 2012

Mother's Day Embroidery Brooch

If you've been following this blog, then these brooches might look familiar to you.  They were inspired by this post I wrote a while back. Only this time I decided to skip a step making them easy to whip up for a last minute Mother's Day Gift.  Instead of creating the embroidery myself, I salvaged pieces from worn out tea towels.  So really, all you're doing is sewing a tiny pillow.  Here's the how-to:

Supplies:
Tea towel already embroidered - look for these at the thrift store.  Since you'll be cutting it up, it doesn't matter if it's stained.  You should pay no more than a couple dollars for the piece.

Matching Embroidery Thread

Sewing Needle

Scissors

Pollyfill

Pin Back that you can sew on

1.  Cut out embroidery piece.  Place on another piece of solid fabric from your tea towel.  Pin together and cut out in the shape you choose.  Make sure to leave extra room for stitching.  You can always trim back the edges after.

2.  Using a back stitch, sew all around the image leaving about a one inch opening.

3.  Lightly stuff with pollyfill and continue to stitch all the way around the embroidered piece.  Knot and sew in loose threads.  Trim edges if necessary.  If you're concerned your fabric will fray, add the tiniest amount of glue to the edges.

4.  Sew on your pin back.  Test out the pin back to make sure it works well.  Usually these kind of pins come in packs of 50 and I've found there are always a couple duds in the pack.

Experiment with different shapes.  The heart in the back came from the corner of a hankie.  There was no one image to outline so I cut it into a heart shape.  I also used a running stitch for the heart.

  Get creative with your pins.  Use them to decorate bags, hats, sweaters, hair ties, or even presents. 

Sunday, May 6, 2012

Our Adventures in Free Comic Book Day

 
This year was the first time our family attended Free Comic Book Day.  It has been going on for eleven years now and is always held on the first Saturday of May.  Comic stores, participating retail stores and even some libraries give out free comics on this day.  I'm sharing this so you don't miss out next year.  Mark your calendars now, seriously.

I heard about Free Comic Day online and decided it was worth checking out.  Other than that, I really didn't know what to expect.  When we got there, we were told we could each pick out three comics.  We stood in line for maybe five to ten minutes before we got to the tables.  They had the comics all grouped by ratings, G, PG, etcetera.  As a parent, I really appreciated this. The kids picked out which comics they wanted, easy.  After we got our comics, we also got to pick out some pins and stickers  and we were done. 

Below are photos of the comics that my children picked out.  If you haven't been in a comic store for a while, I think you might be surprised with the selections. 

This is a two story comic with The Smurfs on one side and Tinker Bell on the opposite.

Here are two of the comics my son picked out, Sonic The Hedgehog and Voltron.  Anyone one remember the TV cartoon Voltron?

These two comics came with multiple comic stories in them.  Owly and Friends also featured "Johhny Boo Does Something" and "Sprout Pigs Out".  Mouse Guard is a hard cover book featuring four different comics.  Remember the movie Labyrinth with David Bowie?  There's a comic about Hoggle and the worm from Labyrinth in Mouse Guard.
 
Did any of you attend Free Comic Book Day?  What did you get?


Friday, May 4, 2012

Carp Kite Drawing Song for Boy's Day


Learn how to draw a carp kite with this cute Ekaki Uta (Drawing Song).  It's another easy but fun way to celebrate the Japanese holiday Boy's Day (May 5th).  Don't worry that it's not in English, you or your children will still be able to follow the directions.  My children really like these videos.  In fact, when I was composing this post, I found my son behind me hoping I was going to play the video.  Along with the carp kite, there are lots of other drawing song videos to choose from.  The ninja is our personal favorite.  What's yours?

Tuesday, May 1, 2012

Origami Fish Envelopes

While most bloggers are sharing craft projects for Teacher Appreciation Day, May Day, Mother's Day and maybe even Cinco De Mayo, I'm here to share the obscure and uncelebrated holiday, Boy's Day with you.  It's kind of funny, every year I share crafts to celebrate the Japanese holiday and yet I know most, if not all of you don't celebrate it.  Still, here I am another year with a Boy's Day craft.  And I even have another craft lined up for Friday, ha!

All joking aside, these fish origami envelopes are perfect for Boy's Day.   Fill them with candy or even better, money.  You can find the how-to at Origami Club.  At the site you'll find step by step directions and an animation for the origami fishes.

Not celebrating Boy's Day?  Use this origami fish for a chopstick cover instead.  

I made the fish with double-sided paper I found at Daiso.  I thought I would share since it's hard to find two color sided origami paper.  And at $1.50 for 60 sheets you can't go wrong.
Zakka Life has moved to a new site!

Click here to visit the new site.